add favorite button in listview with navigator to flutter app
شرح كيفية اضافه favorite button في ListView مع طريقة الانتقال لصفحة جديدة ل Flutter app , ولاكن قبل ذلك سنشرح اجزاء الكود , من المعلوم ان ListTile هو بشكل عام ما تستخدمه لتعبئة ListView في Flutter. في هذا المقال سأغطي جميع المعلمات بأمثلة مرئية لتوضيحها.
شرح الموضوع على اليوتيوب:
1- انشاء مشروع جديد:
ابدأ مشروع Flutter جديدًا , ثم افتح main.dart واستبدل الكود بما يلي , ثم قم ب انشاء كلاس ب اسم FavoriteList :
import 'package:flutter/material.dart';

void main() => runApp(MyApp());

class MyApp extends StatelessWidget {
  @override
  Widget build(BuildContext context) {
    return MaterialApp(
      theme: ThemeData(
        primarySwatch: Colors.blue,
      ),
      debugShowCheckedModeBanner: false,
      home: FavoriteList(),
    );
  }
}
2- انشاء ListView: قم بنسخ الكود بالاسفل:
- ماذا يقصد ب ListView ؟؟ في Flutter هي عبارة عن قائمة خطية من العناصر القابلة للتمرير. يمكننا استخدامه لجعل قائمة العناصر قابلة للتمرير أو عمل قائمة بالعناصر المتكررة.كما ان لها انواع مختلفة انظر لهذا المقال لمعرفة المزيد عن ListView.
class FavoriteList extends StatefulWidget {
  const FavoriteList({Key? key}) : super(key: key);

  @override
  _FavoriteListState createState() => _FavoriteListState();
}

class _FavoriteListState extends State<FavoriteList> {
  @override
  Widget build(BuildContext context) {
    return Scaffold(
        appBar: AppBar(
          backgroundColor: Colors.white,
          title: Text(
            'Favorite button with list view',
            style: TextStyle(color: Colors.black),
          ),
          centerTitle: true,
        ),
        body: ListView(children: <Widget>[]));
  }
}
3- انشاء ListTile وكما هو معلوم تستخدم بشكل شائع ListTile لتعبئة ListView في Flutter.
قم بنسخ هذا الكود ووضعه في ListView.
ListTile(
  leading: FlutterLogo(),
  title: Text('One-line with both widgets'),
  trailing: Icon(Icons.favorite_border),
),
ListTile(
  leading: FlutterLogo(),
  title: Text('One-line with both widgets'),
  trailing: Icon(Icons.favorite_border),
),
ListTile(
  leading: FlutterLogo(),
  title: Text('One-line with both widgets'),
  trailing: Icon(Icons.favorite_border),
),
قم بتشغيل التطبيق وسترى الصورة التالية.
4- قم بانشاء ملف assets , ثم اذاهب لملف pubspace,yaml وقم بتحرير مكان السماح ل اضافة الصور.
5- تعديل شكل ListTile:
سوف نقوم ببعض التعديلات اللازمة , وذلك عن طريق تغليف كل ListTile ب Container من اجل التحكم بها واعطاها الشكل المطلوب عن طريق هذا الكود بالاسفل.
Container(
padding: EdgeInsets.all(2),
margin: const EdgeInsets.all(4.0),
decoration: BoxDecoration(border: Border.all(color: Colors.grey)),).
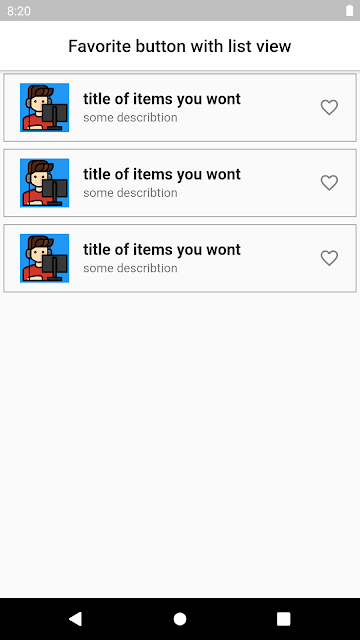
قم بتشغيل التطبيق وسترى الصورة التالية.
ثم استبدل كود Fluttar Logo و اضافة كود الصورة داخل ال Container.
Image.asset(
  'assets/appsmaker.png',
  fit: BoxFit.contain,
),
قم بتشغيل التطبيق وسترى الصورة التالية.
اضافة خاصية ال selected: true ل ListTile.
قم بتكرار الكود بالقدر الذي يناسبك لاظهار المزيد من القوائم.
6- اضافة favorite button:
في البداية سوف نحتاج الى اضافة حزمة ال favorite button الى ملف pubspace.yaml ثم عمل pub get
dependencies:
  favorite_button: ^0.0.4
7- استبدل كود الايقونة السابقة بهذا الكود الخاص ب favorite button.
FavoriteButton(
  isFavorite: false,
  valueChanged: (_isFavorite) {
    print('Is Favorite : $_isFavorite');
  },
),
8- استدعي مكتبة الحزمة للكود.
import 'package:favorite_button/favorite_button.dart';
9- اضافة طريقة الانتقال للصفحة الاخرى عند الضغط على احدى قوائم ال ListView , عن طريق اضافة خاصية onTap.
onTap: () {
  Navigator.push(context,
      MaterialPageRoute(builder: (context) => NextScreen()));
},
10- انشاء كلاس جديد ب اسم NextScreen , كما في هذا الكود بالاسفل.
class NextScreen extends StatelessWidget {
  @override
  Widget build(BuildContext context) {
    return Container(
      color: Colors.white,
      padding: EdgeInsets.only(top: 100),
      child: Center(
          child: Column(children: [
        Card(
          elevation: 50,
          shadowColor: Colors.black,
          color: Colors.red[100],
          child: SizedBox(
            width: 310,
            height: 400,

            child: Padding(
              padding: const EdgeInsets.all(20.0),

              child: Column(
                children: [
                  Container(
                      width: 150.00,
                      height: 150.00,
                      decoration: new BoxDecoration(
                        image: new DecorationImage(
                          image: ExactAssetImage('assets/appsmaker.png'),
                          fit: BoxFit.contain,
                        ),
                        shape: BoxShape.rectangle,
                      )),

                  SizedBox(
                    height: 10,
                  ),

                  Text(
                    'Apps Maker',
                    style: TextStyle(
                      fontSize: 30,
                      color: Colors.green[900],
                      fontWeight: FontWeight.w500,
                    ),
                  ),

                  SizedBox(
                    height: 10,
                  ),

                  Text(
                    'شروحات فلاتر لاتنسى الاعجاب بالفيديو \n                والاشتراك بالقناة',
                    style: TextStyle(
                      fontSize: 15,
                      fontWeight: FontWeight.bold,
                      color: Colors.green[900],
                    ), //Textstyle
                  ), //Text
                  SizedBox(
                    height: 10,
                  ),

                  Row(
                    mainAxisAlignment: MainAxisAlignment.center,
                    children: [
                      SizedBox(
                        width: 100,
                        child: RaisedButton(
                          onPressed: () => null,
                          color: Colors.red,
                          child: Padding(
                            padding: const EdgeInsets.all(4.0),
                            child: Row(
                              children: [
                                Icon(
                                  Icons.touch_app,
                                  color: Colors.white,
                                ),
                                Text(
                                  'Visit',
                                  style: TextStyle(color: Colors.white),
                                ),
                              ],
                            ), //Row
                          ), //Padding
                        ), //RaisedButton
                      ),
                      SizedBox(
                        width: 10,
                      ),
                    ],
                  ), //SizedBox
                ],
              ), //Column
            ), //Padding
          ), //SizedBox
        ),
      ])),
    );
  }
}
شكل مخرجات التطبيق :
شكرا لكم لاتنسو الاعجاب بالفيديو والاشتراك بالقناة ^_^


تعليقات
إرسال تعليق